Showing posts with label toys. Show all posts

Thursday, June 11, 2009

Wire-frame Molding

So I was thinking about my Sackboy and how his wire skeleton was made, and I thought I'd write it up in case anyone else wants to wire-frame a creation. This method should work for anything knit or crocheted, and probably would be easily adapted for sewn figures as well.

Start with a single, long enough piece of stiff-ish wire. My personal favorite for this is the spiral wire from a 2" thick notebook. In general, you can figure out how much wire you need like this: the 2* the height of your figure, plus 4* the arm length, plus 4* the leg length, + 2* tail length (if it has a tail).

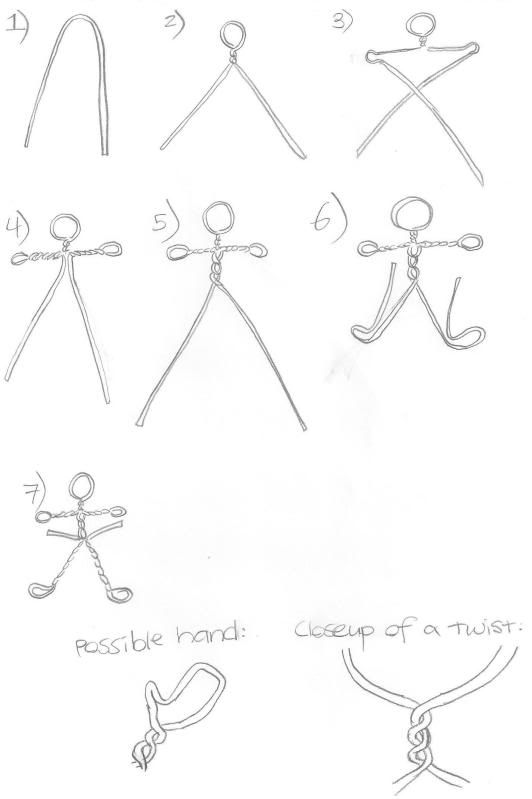
Begin by bending it loosely in half. Bend the central part of the wire into a circle, then twist the two ends two or three times to form a twisted neck. Then bend the wires outward to form arms - about where you want hands to be, form a loop that will be the hand, then twist the free end around the arm up to the body again. Twist the two free ends together to form the torso; stop about where the hips should be. Bend the wires outward again, and like for the arms, form feet, then twist the free ends around the leg. If you have any leftover, you can use it to form a tail, or just twist the remainder around the torso.

If you have a model that's not quite humanoid, you can easily adapt this - just start from the head and work your way along, doing each limb as you come to it. If possible, using a single long piece of wire gives the best result, because it can't come apart with bending. If you must use two pieces, then try twisting them together, forming the head with the twisted part, and going from there.

See this diagram; sorry, it's hand-drawn, but hopefully it gets the point across. Squiggly places are places where the wire is twisted around itself.


I hope someone else will get some use out of it - and I'd love to see any work done with this method!

Sunday, December 28, 2008

Sackboy I


Here he is, in all his glory!

The original Sackboy. I am by far not the first to make one, but I did think of it on my own, before I knew others had done it.

He makes me very proud, even if he's not perfect - his arms and legs are disproportionately long. But other than that, I was super pleased with the final product here.

Made with Lion Brand Fisherman's Wool, black felt, a pink piece of Foamie, a working brass-tone jeans zipper, buttons, and accent stitches in LB Wool-ease Oatmeal. He's got a wire-frame skeleton, made from an old notebook, so he's fully poseable - even his thumbs.

I call him Sackboy I because he is the first of several planned ones. I already have two requests from close friends that I will honor, and during the construction of those I will be writing up a pattern with pictures that will be available on www.etsy.com. I'll make a note here when it's up. I considered selling these myself, but honestly it's a work of love - I don't think I could make enough money for it to be worth the time it took to make this one.

The next iterations will have a few other improvements - while the zipper on this one works, he's stuffed so full, it's hard to zip or unzip. The legs and arms will be proportionate, the body a bit larger, and I would like to add wire framing to the face so other expressions are possible.

Just like the real thing, Sackboy I gets around.

He digs the music. And this gives you a good idea of what size he is.
He's also really good with animals. Spiff likes him, anyway.
He gets a kick out of gaming. Unfortunately he can't play LBP at my house, though.
And one last standing shot, waving to the world.