Yeah, about that Intarsia in the round thing. Maybe later. On my first attempt I messed up the chart conversion and ripped out the whole mess in frustration; right now I'm working on a pair knitted in the round, as god and nature intended I suppose, to get a better handle on the pattern. I still think the theory is solid, but perhaps my complicated-knitting skills need a bit of polishing first.
On that note let's move on to some slightly more cheerful news.
The only bad thing about Ravelry is that it's easy to do things and post them there and neglect to describe them here. One reason I made this blog is to share ideas I come up with, or notes I have while knitting something. So I'll try to be better about that kind of thing.
I only recently learned about Knitpicks - yeah, why did that take me so long - and I have to say that so far I love it. Ordered my own 'sampler' of single skeins of a bunch of different yarns to play with, and so far I'm really liking the quality, and LOVING the price. I decided to dive in and bought the yarn I needed to make Maude, the sweater that's been haunting my dreams. Next week I go on a road trip to Tennessee, so I'm looking forward to getting started on it (not really looking forward to winding all those skeins, but that's a different matter).
Tuesday, July 21, 2009
Thursday, June 11, 2009
Wire-frame Molding
So I was thinking about my Sackboy and how his wire skeleton was made, and I thought I'd write it up in case anyone else wants to wire-frame a creation. This method should work for anything knit or crocheted, and probably would be easily adapted for sewn figures as well.
Start with a single, long enough piece of stiff-ish wire. My personal favorite for this is the spiral wire from a 2" thick notebook. In general, you can figure out how much wire you need like this: the 2* the height of your figure, plus 4* the arm length, plus 4* the leg length, + 2* tail length (if it has a tail).
Begin by bending it loosely in half. Bend the central part of the wire into a circle, then twist the two ends two or three times to form a twisted neck. Then bend the wires outward to form arms - about where you want hands to be, form a loop that will be the hand, then twist the free end around the arm up to the body again. Twist the two free ends together to form the torso; stop about where the hips should be. Bend the wires outward again, and like for the arms, form feet, then twist the free ends around the leg. If you have any leftover, you can use it to form a tail, or just twist the remainder around the torso.
If you have a model that's not quite humanoid, you can easily adapt this - just start from the head and work your way along, doing each limb as you come to it. If possible, using a single long piece of wire gives the best result, because it can't come apart with bending. If you must use two pieces, then try twisting them together, forming the head with the twisted part, and going from there.
See this diagram; sorry, it's hand-drawn, but hopefully it gets the point across. Squiggly places are places where the wire is twisted around itself.
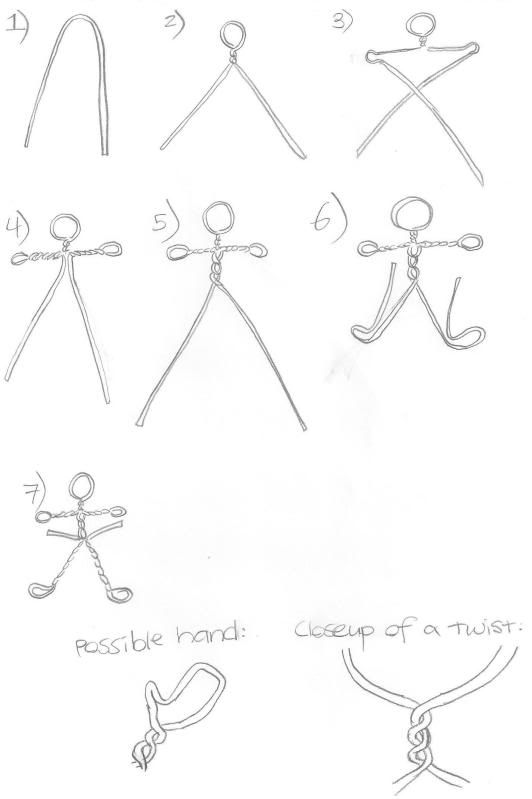
I hope someone else will get some use out of it - and I'd love to see any work done with this method!
Start with a single, long enough piece of stiff-ish wire. My personal favorite for this is the spiral wire from a 2" thick notebook. In general, you can figure out how much wire you need like this: the 2* the height of your figure, plus 4* the arm length, plus 4* the leg length, + 2* tail length (if it has a tail).
Begin by bending it loosely in half. Bend the central part of the wire into a circle, then twist the two ends two or three times to form a twisted neck. Then bend the wires outward to form arms - about where you want hands to be, form a loop that will be the hand, then twist the free end around the arm up to the body again. Twist the two free ends together to form the torso; stop about where the hips should be. Bend the wires outward again, and like for the arms, form feet, then twist the free ends around the leg. If you have any leftover, you can use it to form a tail, or just twist the remainder around the torso.
If you have a model that's not quite humanoid, you can easily adapt this - just start from the head and work your way along, doing each limb as you come to it. If possible, using a single long piece of wire gives the best result, because it can't come apart with bending. If you must use two pieces, then try twisting them together, forming the head with the twisted part, and going from there.
See this diagram; sorry, it's hand-drawn, but hopefully it gets the point across. Squiggly places are places where the wire is twisted around itself.
I hope someone else will get some use out of it - and I'd love to see any work done with this method!
Wednesday, June 3, 2009
Intarsia in the round? Say what?
Spending more and more time on Ravelry, I keep being introduced to more and more beautiful projects. With the Wisdom Poems Sock from Yarn Christmas, I decided to make a beautiful pair of textured fingerless gloves from the pattern here - I call this project my parrot gloves, because when I first saw it, that colorway reminded me of their iridescent feathers. Turns out that the colorway actually shades from the shining blues and greens into orange and red also - pretty much a rainbow - which greatly disappointed me at first, until I hit upon a bothersome but ultimately irresistible idea - cut out the colors that don't look like a parrot and use only some parts of the skein. So I cut it and rewound it into several smaller balls.
Gorgeous! But at any rate, this got me started thinking. One other thing I like about Ravelry is that you can use it almost like a time machine - see what your projects might look like, before you knit them, by looking at other people's finished projects. It can give you a good idea of what colors or types of yarn you would like to use with a particular pattern. And one thing I noticed here was the way that color variegated yarns tended to diminish the detailed texture of these gloves - you see the color change first and the pattern second. Single color yarns, though, make the pattern stand out beautifully. And to go to all that trouble creating that texture, I am damn sure not going to ruin it. But I still wanted to use this color changing yarn.
My solution? I'm going to try to do these gloves with intarsia techniques, and make each 'scale' from a different section of the skein, so the color change is broken up. Yeah. I know. They're knitted in the round. And it's going to be really complicated. I know. Ok?
But I think it's doable, especially because the particular textures here can lend themselves to helping out. The problem with doing intarsia in the round is that when you start the next round, your free yarn is over at the other side of that color section, NOT where you need it. But I think I can work around this by more or less knitting these gloves 'flat', and joining as I go.
These gloves are done with 6 repeats of a pattern chart. Let's say I start at repeat one, and work my way through 2, 3, 4, 5, etc. When I finish repeat number six, and would go back to repeat one in normal round knitting, instead I will pick up a stitch right on the edge of repeat one, turn, and go back working on the wrong side (making the first stitch on that side either a k2tog or p2tog instead of k or p to keep stitch numbers constant) - going back from six to one. This allows me to do each section the way I want to, changing strands with normal intarsia techniques as I move from scale to scale, and still end up with a round garment with no visible seam, as I suspect those little picked up stitches will not show in the change from one scale to another.
I imagine that some version of this technique has been invented multiple times by knitters in the past, but I thought of it on my own and I'm a little proud of it.
There are only three challenges left, but I feel that figuring that out was the hardest one.
1. All the knit stitches in this pattern are ktbl, making twisted rib. I hope that when you do this from the wrong side it looks the same, but I don't know - I'll have to look that up.
2. The chart is written as if you are knitting in the round, so I will have to reverse every other row since I am effectively knitting flat.
3. I will need twelve different strands of yarn at a time to do this. My previous best experience was using seven strands. I hope I am up to keeping them from tangling.
4. I have to actually knit this now that I worked out the pattern. And I have to do it twice because these are gloves.
Hmm. That was four. Well, it's not worked out 100% yet. Anyway I'm waiting for the second skein to come in the mail, because I don't think that part of one skein will be enough.
On the upside, I will also have a handful of little balls of red-orange-yellow-purple portions of the skeins, so maybe I'll think of something cool to do with those. I'll have to cut either the yellow or the purple ends off, though, because I don't like those two together.
Monday, June 1, 2009
Row Counting
 Note the creepy veins visible in my hand. Yes, my skin is actually translucent in many places.
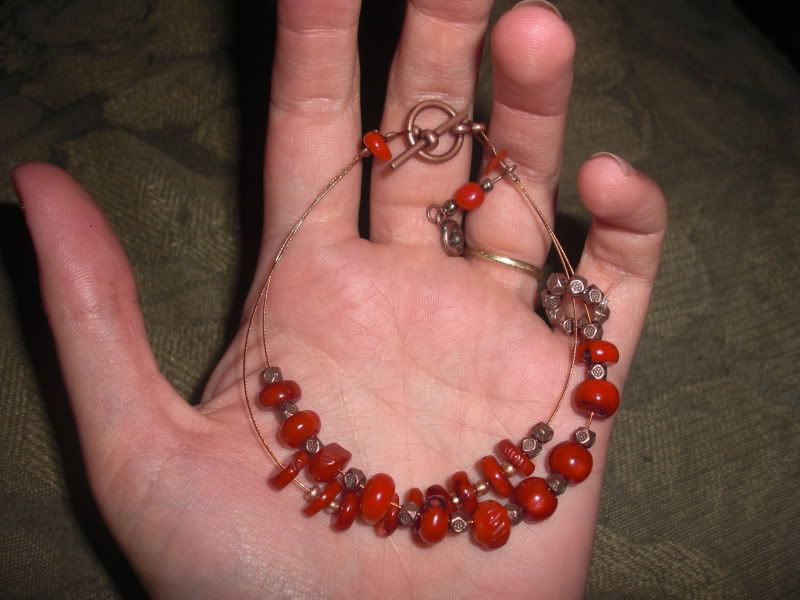
Another beautiful object, pattern from Ravelry. The idea was so cool and so in line with mathy, sciency things - a bracelet that is also an abacus - that I had to make it. But I didn't like some of the original materials, so I improvised a bit.
You pass the larger beads through the stretchy ring of copper beads as you count (in this case, the small beads between big ones are just decorative). The strand with thin beads represents the numbers 1-9, while the strand with fat beads represents 10, 20, etc. The little moon charm on the upper right side of the bracelet marks the 'beginning', so I know which side to count from.
This project really pleased me for a number of reasons. Firstly, it came out beautiful. I love copper, and I love coral, and they have gone together well here. Secondly, it is beautiful AND functional - a simple counter that can go anywhere with me, but also looks nice. Thirdly, it neatly combines my love of knitting and making jewelry.
I used tigertail and crimp beads for the first time with this project, and I like the results. I will probably use it more often. I just hope I can find more of this copper-colored stuff.
If you are interested, here's the original design from Sutherland Studios.
Saturday, May 30, 2009
Meet Maureen
So I had plans to make a felted cloche. I shouldn't say had, since I still intend to make it sometime, but since the first attempt at felting did not go as I expected, I will try again - later.
At any rate, I realized that I needed something upon which to dry my hat, to make sure it retained the proper shape. 'Ah,' though I, 'a foam wig head would be perfect!' And thusly set about finding one.
But it turns out that the makers of foam wig heads are not interested in realism. Either that, or wigs are absurdly small. All the female foam heads that I found were routinely 18" in diameter - and even though my head is small, it's not THAT small. I wanted something that would more or less match my dimensions.
Finally I found her.
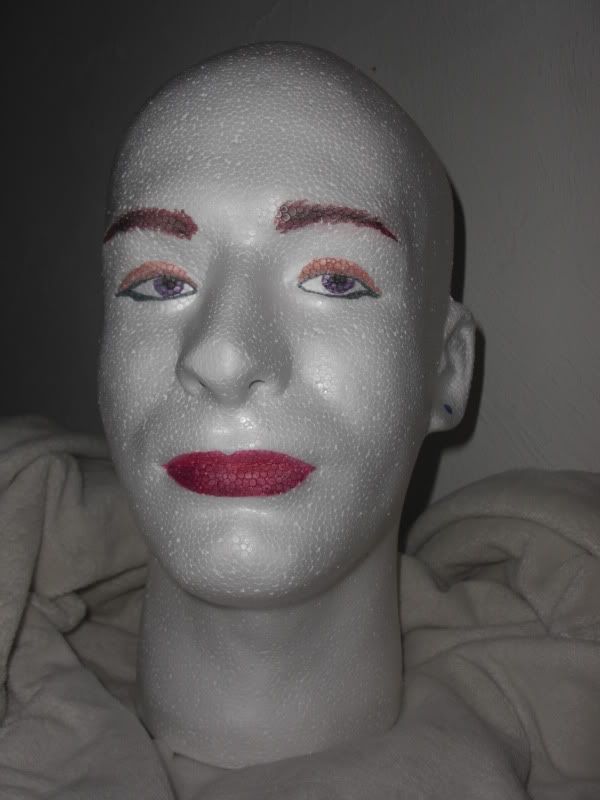
Perhaps a bit less delicately formed than other wig heads, Maureen is still a lovely individual. Of course, foam heads come the way they are manufactured - plain white - so I was the one who drew on her features. Well, to put it more accurately, I revealed the features that were already there, just waiting to be delineated by my art markers.
Some have said that Maureen is actually a man, wearing badly drawn makeup no less. But I will tell you now, she is simply a strong-featured, strong-willed, and entirely feminine lady. Who models hats. Just look at that little half-smile - you can tell that she enjoys her job.
At any rate, I realized that I needed something upon which to dry my hat, to make sure it retained the proper shape. 'Ah,' though I, 'a foam wig head would be perfect!' And thusly set about finding one.
But it turns out that the makers of foam wig heads are not interested in realism. Either that, or wigs are absurdly small. All the female foam heads that I found were routinely 18" in diameter - and even though my head is small, it's not THAT small. I wanted something that would more or less match my dimensions.
Finally I found her.
Perhaps a bit less delicately formed than other wig heads, Maureen is still a lovely individual. Of course, foam heads come the way they are manufactured - plain white - so I was the one who drew on her features. Well, to put it more accurately, I revealed the features that were already there, just waiting to be delineated by my art markers.
Some have said that Maureen is actually a man, wearing badly drawn makeup no less. But I will tell you now, she is simply a strong-featured, strong-willed, and entirely feminine lady. Who models hats. Just look at that little half-smile - you can tell that she enjoys her job.

Thursday, May 28, 2009
Yarn Christmas, in May
I ordered a few things from eBay a couple of weeks ago, and I also went to my favorite local yarn shop today, Really Knit Stuff. Anyone in Tallahassee, who loves knitting and beautiful yarns, should check it out - it's in Railroad Square Art Park.
Anyway, my two orders of yarn both happened to arrive today. One thing that I may not have previously mentioned is how much I love ordering things online, and then getting to open them when they arrive. Sure, I know what's in there, but there's something so wonderful about tearing open a package, and all that bright, colorful fiber spilling out into my lap like soft jewels, just for me. And once I finished rolling around in them, I straightened everything out and took some pictures.
I am super excited about order number one, some recycled sari silk ribbon yarns.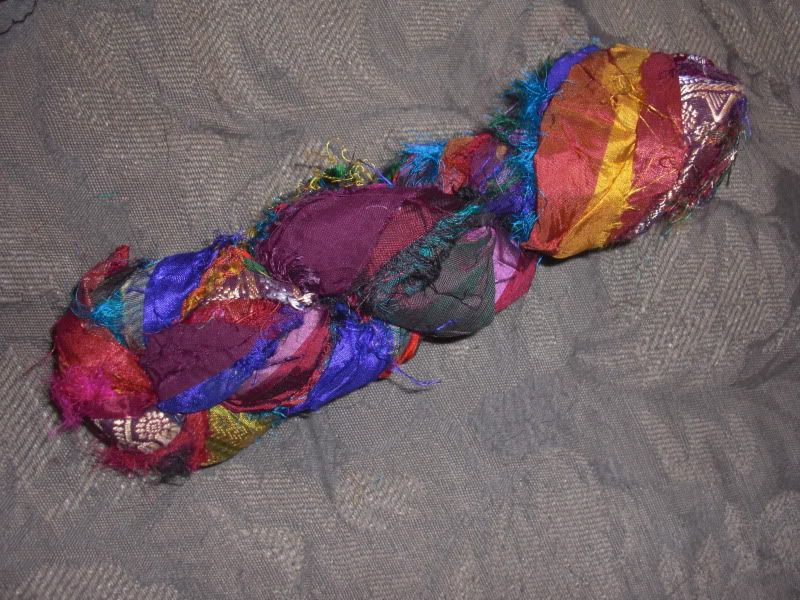

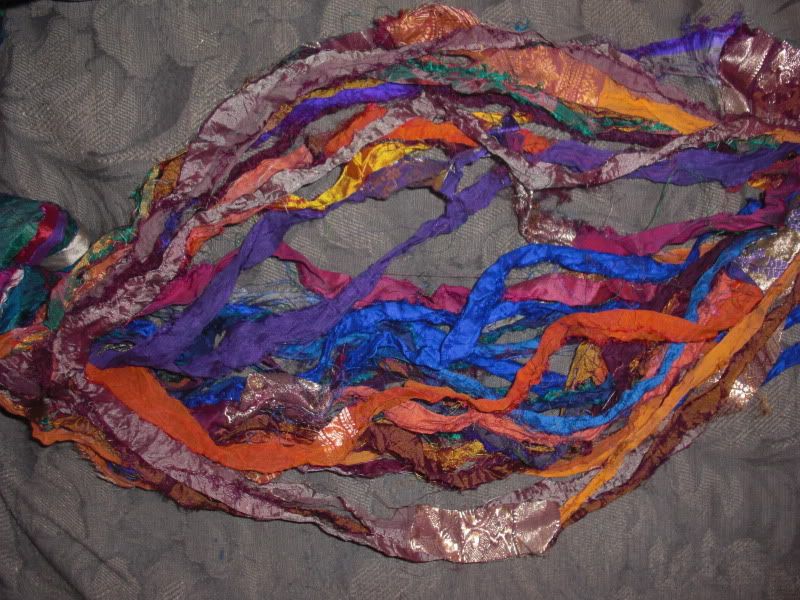
Right now my main thoughts are - what to do with it? I have an idea that I'm sort of ignoring right now, lest it get away - you know, when you have an idea that's sort of nebulous and you let it sit back there and brew for a little while. I'm thinking a skirt with this ribbon woven into it, and used as fringe, but like I said - still a bit nebulous right now. Once I design and make it, I promise I will post a pattern.
Present number two: a yarn grab bag, from another eBay retailer.
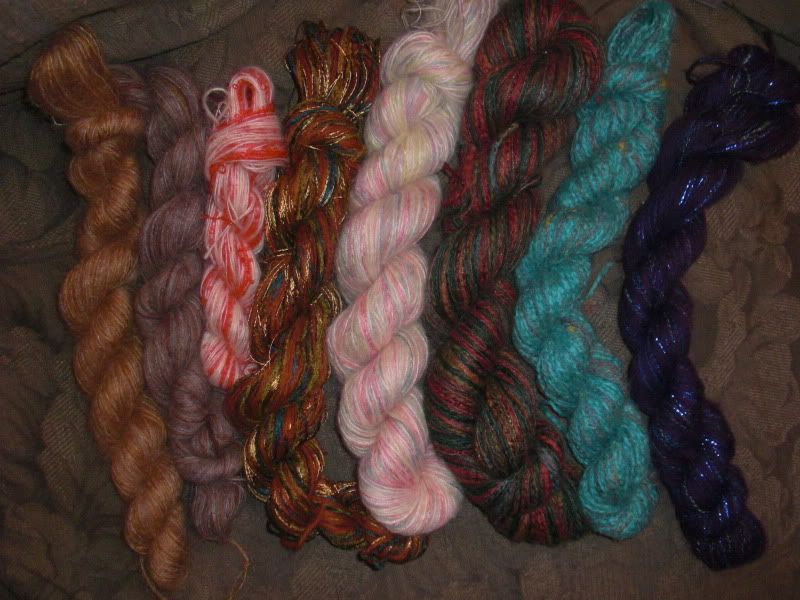
I have nothing in mind for this yet either, although I am excited about the possibilities. Eight small skeins of unique yarn - what COULDN'T I do? At least, that's what it feels like. Realistically, I know I couldn't do anything larger than a lacy scarf, small purse, embellishment on a larger item, etc. But it's still fun to pretend.
Item three was my admittedly indulgent buy at RKS. Wisdom Yarns' Poems and Sonnet are two of my favorite yarns, for their beautiful colorways - like Noro kureyon, only I like ALL of the colors together, not just some of them. Let's call it a toned-down version. Well it turns out they make sock yarn as well.
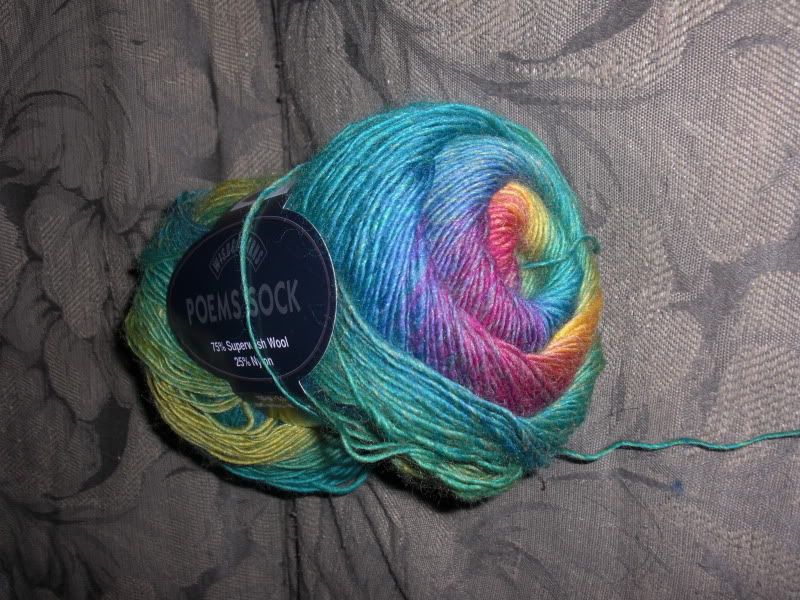
There is no name listed on the label to describe this colorway, but I think of it as Parrot. It so strongly makes me think of a Blue Macaw, I don't know what else I could do with it but make something that looks feathery.
Merry Christmas, Shishkani.
Anyway, my two orders of yarn both happened to arrive today. One thing that I may not have previously mentioned is how much I love ordering things online, and then getting to open them when they arrive. Sure, I know what's in there, but there's something so wonderful about tearing open a package, and all that bright, colorful fiber spilling out into my lap like soft jewels, just for me. And once I finished rolling around in them, I straightened everything out and took some pictures.
I am super excited about order number one, some recycled sari silk ribbon yarns.
Right now my main thoughts are - what to do with it? I have an idea that I'm sort of ignoring right now, lest it get away - you know, when you have an idea that's sort of nebulous and you let it sit back there and brew for a little while. I'm thinking a skirt with this ribbon woven into it, and used as fringe, but like I said - still a bit nebulous right now. Once I design and make it, I promise I will post a pattern.
Present number two: a yarn grab bag, from another eBay retailer.
I have nothing in mind for this yet either, although I am excited about the possibilities. Eight small skeins of unique yarn - what COULDN'T I do? At least, that's what it feels like. Realistically, I know I couldn't do anything larger than a lacy scarf, small purse, embellishment on a larger item, etc. But it's still fun to pretend.
Item three was my admittedly indulgent buy at RKS. Wisdom Yarns' Poems and Sonnet are two of my favorite yarns, for their beautiful colorways - like Noro kureyon, only I like ALL of the colors together, not just some of them. Let's call it a toned-down version. Well it turns out they make sock yarn as well.
There is no name listed on the label to describe this colorway, but I think of it as Parrot. It so strongly makes me think of a Blue Macaw, I don't know what else I could do with it but make something that looks feathery.
Merry Christmas, Shishkani.
Ravelry is amazingly useful
I probably get more traffic FROM Ravelry than anywhere else, but if you have stumbled into my humble abode by mistake, here's a tip - apply to join Ravelry today. I have never seen a better resource for connecting knitters and crocheters, keeping track of your yarn, tools, projects in progress, finished works, and patterns you'd like to tackle someday.
It has all these integrated tools that make it perfect for someone like me, who feverishly organizes things and then loses them. I once had a 3 ring binder full of patterns that I was interested in . . . but I have since taken things out, put other things in, and finally simply lost the binder itself.
Ravelry takes care of all that kind of thing for you; plus, if you are a pattern hound (also like me) they have a great search engine for free (or purchasable) patterns that pulls info from some of my current favorite spots - knitty, yarn company websites like Lion Brand, Moda Dea, Caron, and Bernat, etc.
It also has a well built community system where you can get in contact with thousands of other knitters or crocheters, find interesting blogs, learn new techniques. All that good stuff. So do yourself a favor and join - it's well worth it.
Changes!
Well, I realized that it's May. And hey, I have (had) a blog. Which I seem to have forgotten about. Time to pick the thread back up; while I have not been blogging, I at least have still been knitting, in the few intervening months.
A new start goes well with a blog redesign. The background and banner pictures are from the Bernat Felting neckwarmer; I love that set of colors so much that now they're part of the blog, as well as part of my knitting. And as a bonus I have learned a bit about messing with the standard Blogger template.
Right now I still have many pictures to tweak and format, but expect some new patterns and projects to be up very soon.
Wednesday, January 7, 2009
Knitting away
So I've been working with my knitting machine for the last few days, and I have to say so far I am really enjoying it. Even making the ribbing, which I thought I would absolutely hate, has been kind of fun in a mindless zen-like way. Since the machine can pretty much ONLY knit in stockinette, you do ribbing by stockinetting the section, then dropping the stitches that should be purled and hand-hooking them back up in the opposite direction. It's not quite as bad as it sounds, since the machine comes with a hand hook tool that makes this pretty easy, and the knitting is in a more or less natural position to do this with.
I have decided that I'll write a full review of the machine. So far, the majority of my experience is in making one of the patterns from the included pattern book - the men's style sweater (identical to woman's, except it has ribbed edges rather than rolled.) But seeing as how this is the last pattern, I think it brings in some of the most complicated things, and runs through most of the machine's abilities - stockinette stitch, making rib stitches, seaming on the machine, shaping with increases and decreases. It does NOT contain fair isle or intarsia techniques, but I am working on those independantly as well.
This is a review of the Bond America Ultimate Sweater Machine Deluxe kit, which is the same as the standard USM except it comes with a few accessories like one extension kit that adds 20 needles, intarsia keyplate, and row counter.
Setup
Setting up the machine might be a bit tough for those who aren't real do-it-yourselfers. First comes assembly, which is not very hard. The instructions that come with it are simple. All you need to do is bolt together the two halves of the bed. If you have an extension, you just bolt that between the two halves. The only trouble I had here is that the edge of my left half didn't want to easily line up with the edge of the right half or the edge of the extension. I fixed this by trimming the small strip of foam cushioning that stuck out from under the needle retainer. Things can get more complicated if you are trying to attach two machines together - some advanced users do this so they can have more needles in a row, useful for very wide projects - but for a standard/deluxe model, I found it quite easy. Once it's assembled, you have to then clamp the machine to a table. It comes with a non-skid mat you can simply set it upon, but I don't think this is a good idea. To work right, the knitting hanging from the machine needs to be weighted, and it seems like it would easily tip off the table if it weren't clamped down.
The kind of surface it attaches to is pretty specific - it needs to be a flat-edged, solid table, with at least 2" of room between the table edge and any other structures - and not everyone has that kind of table available. Including me. One thing that works perfectly, though, is a quick trip to the hardware store. One 2x12 and two large C-clamps are all you need (about $15). Attach the USM to the board following its instructions, and then you can clamp the board with its C-clamps to nearly any horizontal surface; counters, tables, etc etc. One thing I really like about this is that you can then unclamp the board, but leave the machine still attached, and it's easy to store out of the way like that. I suppose you could just detach the machine from the board, but somehow when it is clamped down to the board, it seems a lot more secure.
Useability
When getting started, it seems a little complicated at first. As mentioned previously, there needs to be downward tension on the knitting to get the rows to knit right, so most projects start with a weighted hem. This means that most projects also end with (or have somewhere in the middle) removing the hem and finishing that edge. You start by placing the hem on the machine, then knitting a starting row with provided elastic thread. One of the accessories sold by Bond is what they call Ravel Cord. It's basically heavy-weight nylon string that you use to cast on instead of the elastic thread, because when you are ready to remove the hem, it just pulls out. I saved money and time, and found the best of both worlds, with a $1 pack of thick elastic cord from the sewing supplies section. It pulls out easily, but has a little give too. Once the first row is cast on, you pull the hem off the needles so that it hangs down, and start knitting with real yarn.
I have heard of some people having trouble with the carriage jamming. I have found this, so far, to be mostly due to user error. Times when I was manually adjusting things, or had just started a section of seaming (you can do this right on the machine, by inserting the needles through the edges of two pieces together and knitting a row), usually left one or two needles adjusted slightly incorrectly and the carriage would jam against them. Almost every time, I found it was due to how I had done something, and a slight push on the needle to get it started in the right direction was all that was needed.
Doing stockinette stitch with a yarn in the correct gauge has so far been flawless, and fast. This is where the machine really shines. You hardly even have to pay attention, except at the end of each row; when you finish a row, the carriage has to move past the working needles into an unused or empty section, and you have to make sure you take up the extra yarn that feeds out. Other than that, it's pretty mindless work. I don't have problems with dropped stitches, and I think that is because I pay attention to the weight tension on the growing piece. There must always be weight hanging from the knitting, and especially from the edges. This is where the (not included) claw weights would be very useful, to pull the edge bits straight downward. I had a great tip from another knitting blog, (I'll have to look this up later because I don't have the link here), about how to fashion your own with cheap forks and fishing weights.
With regular knitting I sit on the couch and watch/listen to TV. With this, I have got a lot of use out of podcasts and audiobooks on my iPod to keep me entertained while I work.
So far I have not ventured into the realm fair isle very far. I had worked out a technique to do fair isle faster than the way it is presented in the instructions, and this seems promising, but it will need some more tinkering, because right now it drops stitches after long floats (more than 4 stitches or so). The instructions call for you to knit the main rows using the carriage, and then do the fair isle second color stitches manually (easily done by moving needles on the machine with your hands, but less fast). My method lets you knit across one row for the main yarn with those needles active, then again for the second color with only those needles active. But again, it will need some work. Also, it's only appropriate for SOME fair isle patterns. Once I perfect it, I will write it up more carefully here. I have not tried Intarsia at all, perhaps I will have to add to this review once I have.
Durability
I have little qualms about this so far. Again, I think that (barring having received defective pieces), with care it should go pretty smoothly. I can see accidentally breaking or bending needles, though, and I expect I will have to replace some somday. The plastic parts are not as well machined as I would have liked, so I expect that with repeated use, I may encounter more problems, but so far I have had none. I guess I would say that nothing feels flimsy, or badly made, but none of it feels precision engineered either, and that does show. One of the accesories they sell is silicone lubricating spray, to replace the wax for the keyplace - I would highly recommend this. I had some already, and you can go get this at any hardware store rather than order it online, but again I can't stress enough how silicone lubricant is far superior to the wax. I get less jamming this way, even when doing trickier things like seams along sideways borders.
Cons
Value
It depends on how you want to compare this. For a casual knitter, it may be too much money. For a knitter who's in more 'deep' and wants to move faster, or wants to produce simple items to sell, this is probably a godsend. And for someone who wants to get into machine knitting, there is pretty much no more affordable first step than this. I would encourage anyone who is interested to look for online deals. At a Jo-Ann's store, they price the ISM at $150.00 in my town, and the USM at $180, and they don't even sell the USM Deluxe in our store. But I found the Deluxe on sale for $150, a great deal as far as I'm concerned.
Compared to Hand Knitting
I have said it already, but I'll repeat it. Stockinette stitch is blazingly fast. The machine is almost worth it just for that alone. It's also very regular. I don't have a lot of problem with variation in my stitches, but I know some knitters do, and the stuff this machine produces is perfect. Some things don't come as easily to the machine - number one being anything that requires purl stitch. Before you close this review in disgust, I'll tell you that there are a lot of ways to compensate that, and you can definitely DO those things using the machine. It's just not near as fast as stockinette work is. You can also combine the machine with hand knitting, which I think is a really good way to go about it, but again that's personal choice.
It also has a width limit, which is fine for people who make clothing in the average to slightly plus size range, but not good for XXL and up sizes, or things like one-piece afghans. The extension kit, adding 20 needles, makes it easy to go up to XXL and perhaps XXXL for some things, but for larger than that, or single panel afghans of an acceptable size, you need several extension kits, or multiple USM beds. It's actually pretty easy to hook up more than one bed if you have them, but that's the major if. At the price of one machine, it's a bit less attractive to think about buying two.
Overall
For a knitting machine, it is affordable (the next simplest one on the market today is about $500 I believe), but the cheap cost comes at the price of some versatility. It can only machine knit in stockinette stitch, and it handles increases and decreases about at the same speed that regular knitting goes. Anything more complicated than that requires more work. However, I feel that most of the simpler additional stuff is not at all, or at least not much, slower than it would be by hand, especially if you average it out. However, stuff like garter stitch or seed stitch is probably far too much work to bother with on this machine, as the involved setup would eat up any time saved. It's a good start for someone who wants to get into machine knitting, but not a good tool for the hand knitter who loves intricate and complicated work.
Saturday, January 3, 2009
I admit it.
I am a cheater.
Arguably my favorite Christmas present this year, the one I drooled over, is an Ultimate Sweater Machine by Bond America.
I am now among the league of machine knitters.
I know some hand knitters think of this as cheating, and in some ways they are right. In other ways, I think of this as just a tool. It's useful and incredibly fast at blazing out panels in standard stockinette stitch. But that's about all it does fast. And I'm okay with that. Right now, I'm just looking forward to learning how to use it in more detail. Everything else will follow later.
I read up on it a lot before buying it. It seems the people who owned one fell into three categories: perhaps a quarter to a third hated it, could never get it to work, and ended up bitterly disappointed (and out $200 as well). A larger proportion said it was ok, but complained of problems. And a very small group seemed to love it and have no issues. So far I have had no real problems with it - or, I can say, the problems I have had, I traced back to user error. I think this kind of thing is great for people who like machines and can understand how things work in general, but terrible for people who have no head for mechanics. We'll see, though, if that assumption lasts, or if I remain quite so happy with it in the long run.
I am sure I will be posting more info about it. So far, I have only set it up and done a practice panel that let me figure out how to use it, and then how to do things like increase and decrease. Next, I think, I will look into how to do fair-isle knitting on this thing - it looks pretty easy, from the instructions, and I have just the project in mind.
What's in a name
Turns out I am, by far, not the first person to think of the name 'Nerd Knits' either. In fact there is a quite popular knitting blog by that very same name. Ashamed, I have renamed this back to its original, if less interesting, title - Shishkani Knits. And I have resolved to start googling more, at least before I start things like this.
All my apologies, should she ever read this, to the creator of the real 'nerd knits' blog. The name was, and still is, hers.
I thought I would expound though a bit on why I chose this name in the first place. I think it is mainly because I started knitting like most people do, probably, with no particular goal in mind other than making and owning pretty things. But I quickly found my work being colored by the other things I do and enjoy. I dreamed up projects based on video games, TV shows, or more boring things like the fruit flies I study. I wrote up patterns, though I haven't had time to start on either, for a scarf that gives the sequence for the A allele for the ABO gene (My blood type is A+, hence the choice) and the Blue Sun logo from Firefly. I hoarded interesting scientific patterns like the DNA cable at http://www.twosheep.com/helix/ and the nautiloid models at knitty.com.
So again, while I will no longer call this blog Nerd Knits, I still think of it in that kind of category.
Subscribe to:
Comments (Atom)