In the past two years a lot of things have happened. My last post was just after I started my work as a programmer. It was before my epilepsy was diagnosed, which has been a whole other pile of shit to deal with.
But I've still been knitting, playing video games, doing the things I like. And I have a huge backlog of things I could have been writing about and sharing but didn't. A lot of items that I could have written up as patterns but was too lazy to do it.
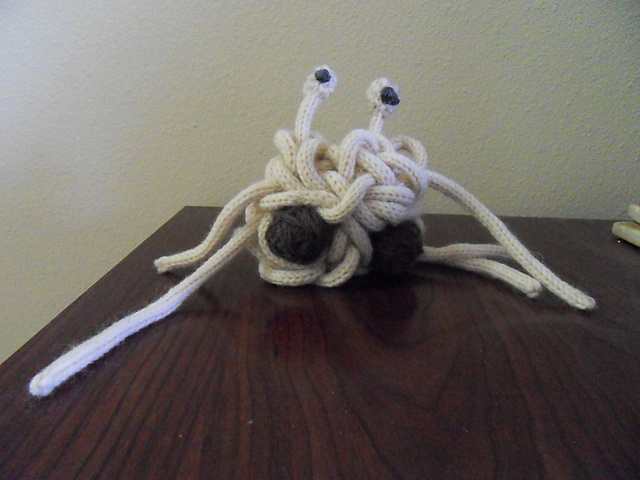
Here's one example: the evolutionist's baby toy! Although it's really easy, it pretty much doesn't require a pattern at all, so this is more of a tutorial.
I present to you the Flying Spaghetti Monster!
(artist's impression)
Sport or fingering weight yarn in an off-white color
Yarn in some kind of brown wool
A piece of something semi-stiff - wire, plastic foam sheets, whatever, to hold up the eye stalks
Plastic eyes, if his noodly appendage driveth you so
A sharp needle with a big enough eye for yarn
Washing machine or a needle felter
Patience or one of these cool bastards
(via JoAnn's Fabrics)
The Embellish-knit is basically a tiny knitting machine with four latch hooks. You feed in the yarn correctly and turn the crank and out comes a truly ridiculous amount of 4-stitch i-cord. I bought one as a whim, years ago, and this is pretty much the only interesting thing I've done with it since I had it.
So get it started with the off-white yarn. I made it work with really light worsted - fisherman's wool - but anything heavier than that will jam the machine. Make sure to weight the yarn coming out the bottom appropriately - it comes with a tiny little clip-on weight thing that is not near heavy enough for my tastes. If it's not weighted enough the needles won't grab it and it'll get wonky and fall out of the machine. . Find something heavier you can tie it to - it doesn't have to be huge. I think I used a roll of duct tape. Now spin that crank until you have a lot of i-cord, a pile of i-cord - 15 feet of i-cord, at least, and more if you want him to be really noodley. It doesn't take all that long, but if you feel the need for speed or you are channeling Tim Allen and feel that your work just doesn't have enough testosterone yet, I'd recommend this high-tech method shared by 1klik6.
Or, if you are Catholic and have been looking for a penance, you can knit it all by hand!
You need at least three longish pieces so you can make them separately if you like; I didn't want to bother so I just did the whole thing in one go. It spins as it comes out the bottom of the machine so you have to let it hang freely. As I made more cord I just bundled and tied it up to keep it off the floor.
Now it's time to make yourself some balls - even if you've got a pair, you need two more for this. You could knit or crochet a ball, but I just rolled up the brown yarn into a ball and needle felted it around. You could also throw a couple of rolled-up balls into the washing machine, but make sure they are bigger than you want and maybe wrap em in a piece of panty hose or something to make sure they don't come apart.
Start assembling the main body. If you have one long i-cord, cut it into pieces and thread the loose end of the yarn through the four exposed stitches on each side of the cut. I had one really long piece to serve as the two main noodles, and two other pieces to serve as body and shorter noodles. This part is really easy and sort of free-form. I started with one piece looped into a figure eight, where the holes in the 8 were just big enough to cradle the meatballs, then I tacked the balls onto the noodles with a few strands of the white yarn. You need that sharp needle to poke into the meatballs.
Shape the piece of something pointy into the eyestalk holders. Bend a piece of wire into a U, or cut a piece of stiff material into that shape. It has to be narrow enough to fit inside the i-cord. Slip a short piece of i-cord over it and fix it in place between the meatballs. At this point you could attach googley eyes or beads or something, I just knitted small balls atop the eyestalks and embroidered pupils onto them.
Now here comes the artistic part where this becomes really you - loop the noodles around however the fuck you want. It's that simple! Once you've got them good, you can tack some of them in place too, so he won't just unravel. Leave at least two longer ones and let the ends of the shorter ones poke out here and there to get that really realistic noodly look.
And there you have it. Your very own tribute to the gods of Evolution.


