Showing posts with label project. Show all posts

Friday, May 17, 2013

I'm not dead yet

Ah, nothing like resurrecting a long-dead medium.  I guess I just got bored with having a blog.

In the past two years a lot of things have happened.  My last post was just after I started my work as a programmer.  It was before my epilepsy was diagnosed, which has been a whole other pile of shit to deal with.

But I've still been knitting, playing video games, doing the things I like.  And I have a huge backlog of things I could have been writing about and sharing but didn't.  A lot of items that I could have written up as patterns but was too lazy to do it.

Here's one example:  the evolutionist's baby toy!  Although it's really easy, it pretty much doesn't require a pattern at all, so this is more of a tutorial.

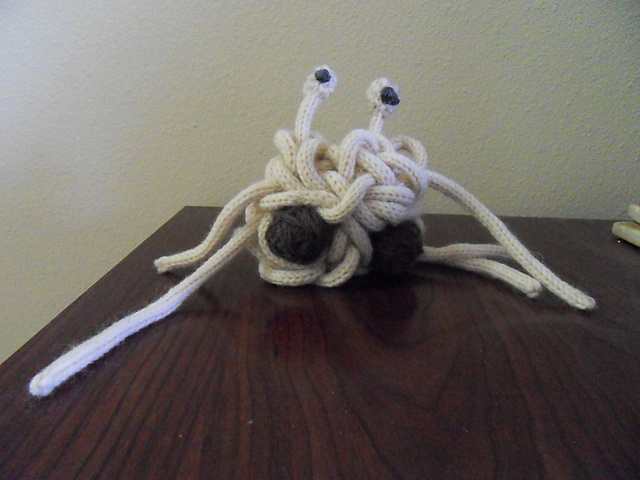
I present to you the Flying Spaghetti Monster!

(artist's impression)

Sport or fingering weight yarn in an off-white color
Yarn in some kind of brown wool
A piece of something semi-stiff - wire, plastic foam sheets, whatever, to hold up the eye stalks
Plastic eyes, if his noodly appendage driveth you so
A sharp needle with a big enough eye for yarn
Washing machine or a needle felter
Patience or one of these cool bastards


The Embellish-knit is basically a tiny knitting machine with four latch hooks.  You feed in the yarn correctly and turn the crank and out comes a truly ridiculous amount of 4-stitch i-cord.  I bought one as a whim, years ago, and this is pretty much the only interesting thing I've done with it since I had it.

So get it started with the off-white yarn.  I made it work with really light worsted - fisherman's wool - but anything heavier than that will jam the machine.  Make sure to weight the yarn coming out the bottom appropriately - it comes with a tiny little clip-on weight thing that is not near heavy enough for my tastes.  If it's not weighted enough the needles won't grab it and it'll get wonky and fall out of the machine.  .  Find something heavier you can tie it to - it doesn't have to be huge.  I think I used a roll of duct tape.  Now spin that crank until you have a lot of i-cord, a pile of i-cord - 15 feet of i-cord, at least, and more if you want him to be really noodley.  It doesn't take all that long, but if you feel the need for speed or you are channeling Tim Allen and feel that your work just doesn't have enough testosterone yet, I'd recommend this high-tech method shared by 1klik6.


Or, if you are Catholic and have been looking for a penance, you can knit it all by hand!

You need at least three longish pieces so you can make them separately if you like; I didn't want to bother so I just did the whole thing in one go.  It spins as it comes out the bottom of the machine so you have to let it hang freely.  As I made more cord I just bundled and tied it up to keep it off the floor.

Now it's time to make yourself some balls - even if you've got a pair, you need two more for this.  You could knit or crochet a ball, but I just rolled up the brown yarn into a ball and needle felted it around.  You could also throw a couple of rolled-up balls into the washing machine, but make sure they are bigger than you want and maybe wrap em in a piece of panty hose or something to make sure they don't come apart.

Start assembling the main body.  If you have one long i-cord, cut it into pieces and thread the loose end of the yarn through the four exposed stitches on each side of the cut. I had one really long piece to serve as the two main noodles, and two other pieces to serve as body and shorter noodles.  This part is really easy and sort of free-form.  I started with one piece looped into a figure eight, where the holes in the 8 were just big enough to cradle the meatballs, then I tacked the balls onto the noodles with a few strands of the white yarn. You need that sharp needle to poke into the meatballs.

Shape the piece of something pointy into the eyestalk holders.  Bend a piece of wire into a U, or cut a piece of stiff material into that shape.  It has to be narrow enough to fit inside the i-cord.  Slip a short piece of i-cord over it and fix it in place between the meatballs.  At this point you could attach googley eyes or beads or something, I just knitted small balls atop the eyestalks and embroidered pupils onto them.

Now here comes the artistic part where this becomes really you - loop the noodles around however the fuck you want.  It's that simple!  Once you've got them good, you can tack some of them in place too, so he won't just unravel.  Leave at least two longer ones and let the ends of the shorter ones poke out here and there to get that really realistic noodly look.

And there you have it.  Your very own tribute to the gods of Evolution.


Saturday, June 19, 2010

Free Pattern: Badge of Honor

So, I was looking through my projects on Ravelry, and I saw this little guy.


Then I realized there was no pattern listed. What? I know I hadn't come up with this idea on my own. Where was the pattern? I searched Ravelry frantically, because this sort of thing bugs me. No luck. Kept searching. Still nothing. WTF, mate?

So I googled it, and then I found the source; a post here, about halfway down the page. McLovin (formerly Ax174), I must thank you, because this is such a cool little project. I made several of them, and they travel with me on my purse, knitting bags, etc. I've even given a few away.

But I have become so indoctrinated into the idea that everything, everything should be on Ravelry, that I can't just let it lie. While her post was useful (after all, I made mine by looking at a picture of hers), some people might want a more verbose pattern, with yarn measurements and more explicit instructions.

So here is that more verbose pattern.
I actually don't think it needs pictures to be understood, so I decided not to clutter up this post with them. However, here is a post full of those pictures if you want to have a look.

Badge Of Honor Mini-Skein Charm
Materials:
4-10 yards of fingering weight yarn, or 8-20 yards of laceweight. You can try this with sport or DK, but I think it might be a little too bulky to give the right effect. 10 yards makes quite a thick skein; the sample above used around 6. Using fingering weight will make a charm that looks like a miniature worsted or bulky weight skein; using laceweight would make a miniature sock-weight skein.

A pair of needles: exact size is unimportant, but I'd recommmend somewhere from US4-US9, not too huge and not too small. These are only needed to put the proper twist into the skein charm. DPNs or straights are equally good.

A keyring

A piece of cardboard, or a book or magazine

Printer, paper, and clear tape, if you want to make a label.

Directions:
1. Cut your cardboard into a rectangle that is 10 inches long and a few inches wide, or find a book around the same size. If you want a longer, thinner skein, make your cardboard longer than 10 inches or find something else long enough - McLovin mentioned that she wraps hers around a magazine. Wind your yarn around it in the long direction until you run out of yarn. Tie the two ends together very securely, and trim the ends so they are short. If you want to be super sure it won't unwind, then put a drop of superglue on the knot and wait for it to try before continuing.

2. Slip the yarn off the cardboard (don't let it unwind!) and put your two needles into the big loop. Hold the needles as far apart as they will go, with the looped yarn stretched between them. Now, use those needles as handles to twist these loops of yarn up pretty good. You'll know you have twisted it enough when the twist starts trying to loop up on itself a little (if this sounds confusing, try it and you will see what I mean.)

3. Once it's twisted enough, fold it in half, bringing the two needles together. It should twist into a skein shape on its own at this point. If the skein seems too loose, unfold it and twist the yarn some more before refolding.

4. When you're happy with the appearance of your skein, you can take out one of the needles (carefully, so it doesn't unwind) and transfer those loops onto the other needle; this will hold the skein in position.

5. Now it's time to put it on the keyring. This part can be a bit tricky, especially if you have a really stiff keyring. What you need to do is hold the keyring open and slip all the loops of yarn on your needle onto the keyring, the same way you'd put a key on there. I find that sometimes, forcing the ring open, then wedging something like a button in there helps hold it open while you load in the yarn.

Slide the loops all the way around (again, like you do to put a key on) until the skein is completely on the keyring, and you're finished!

If you want to make a label, below are some label templates I made for mine. I printed mine out and covered it with clear packing tape to make it a little more stable, then put it around the skein and taped it closed. Be aware, the label won't hold up to abuse like the skein does - I lost the label off mine some time ago, but I have found that I actually like it better this way, you see more of the yarn.

Now, stick your charm anywhere you feel like it!


Thursday, March 25, 2010

Pattern: Quick and Cute Shrug


OMG I'M NOT DEAD NEW POST

Anyway, a while ago I made a nice shrug on my Bond USM, and like an idiot I gave it a pattern page on Ravelry . . . without actually writing up a pattern. My apologies for that, to the one person who seemed to be interested! Without further delay, here is the pattern. Right now it only comes in plus sizes - in other words, me-sized - but I'll at least work out a recipe to resize it.

Quick and Cute Shrug

This is knit mostly like the bond shrug, but it incorporates shaping so that it is a better fit! I noticed a lot of pictures of the finished object on Ravelry looked a little baggy around the armpits, so this version starts out narrow at the elbow, widens to the widest part of the arm, and then shrinks again so that the back is a good fit (and does the reverse for the other arm). It is knit sideways, so it starts at the end of one sleeve, knits along the arm and across the back, then down the other sleeve.

The Simply Soft makes a silky and not too elastic shrug. The one I'm wearing in the picture has perhaps one inch of negative ease, so it clings a little, but the ribbing remains stretched out and flexible. If you want something more elastic and clingy, you might try a wool yarn of similar gauge. Just check your tension first.

Now resized for S, M, L, or XL! I wrote it for me, which means size XL, so the measurements for S,M,L can be found in parentheses before the measurement for XL.
Arm just above the elbow, (7", 8", 10") 12" around. Arm at largest point before armpit: (11", 12", 14") 16" around. Cross-back measurement: (14",16", 17") 18". Height of back panel, collar and ribbing included: about 20". All sizes have sleeve length of 12".

Machine knitting techniques you should know before trying this:
Simple decreases and increases
Making ribbing
Picking up stitches along the side of a piece
Binding off
On-machine seaming (optional)

Estimated Yardage: (450, 475, 500) 530 yards
Skeins of yarn needed: 2, no matter what size. While these yardages are estimated based on the yardage of a sample knit in size XL, they still range between 1 and 2 skeins of Simply Soft. I also doubted that yardage, to be honest; but I weighed the finished XL that I made and found it weighed 286 grams, which is equivalent to 1.68 skeins, and I KNOW that it's knitted to the specifications below.

Materials needed: 2 skeins of Caron Simply Soft, waste yarn, yarn needle, USM Row counter or a piece of paper to tally rows on

Tension: 18 stitches and 24 rows = 4", UNSTRETCHED, using keyplate # 2.5

CO (32, 36, 44,) 56 stitches using waste yarn.
Knit 4 rows using waste yarn.
Change to main color.
Reset counter to 1. Knit 54 rows, increasing one stitch on both sides every 6 rows.
Reset counter to 1. Knit 18 rows, decreasing one stitch on both sides every ( 0,0,2) 1 row. (Note: this means for size small and medium, do not decrease. For large, decrease every second row. For xl, decrease every row.)
Reset counter to 1. Knit (84, 92, 96) 108 rows.
Reset counter to 1. Knit 18 rows, increasing one stitch on both sides every ( 0,0,2) 1 row.
Reset counter to 1. Knit 54 rows, decreasing one stitch on both sides every 6 rows.
Change to waste yarn - knit 4 more rows.
Remove work from machine, do not bind off.

Your choice here: add ribbing using the machine to either cuff flat, so it will have to be seamed, or pick it up later and hand knit it with DPNs or a circular needle.
I did it by hand because I was so eager to seam it up I forgot to do the ribbing first! Upon reflection I like it better that way because there is no visible seam in the ribbing. If you do it by hand, then wait until you have finished the rest of the garment. Then, pick up all (32, 36, 44,) 56 stitches using DPNs or a circular needle. Knit 8 rounds of k2p2 ribbing, then bind off - not too tight, but not too loose.
If you want to use the machine:
Rehang the beginning edge by putting needles through the first loops of the main color - one needle per original stitch, 54 total. Place the small weighted hem on the same way you normally would, using ravel cord or elastic, after you have rehung the beginning edge.
Knit 8 rows; convert to k2p2 ribbing. Bind off in whatever manner you prefer, but make sure it's not too tight.
Remove elastic or ravel cord to remove hem; pull out waste yarn.
Repeat for the other arm.

Time to seam up the sleeves of your work! You can do this by hand or on the machine. Fold the piece in half lengthwise and seam the first 10" from the sleeve beginning towards the back, on either side. If you are unsure of fit, you can use safety pins or bobby pins to pin this hem and try it on.
To seam by hand: use your yarn needle and sew the seam together.
To seam by machine: fold the shrug with right sides together and wrong side (purl side) showing. Use your latch tool to put the needles through both layers. Knit a single row through both of them - use keyplate 3 or 4, and you will have to have one hand on the carriage and the other hand gently putting tension below (since no weight will be attached at this point). Then bind off.
Make sure you seam up both sleeves.

Now it is time to add the bottom ribbing. Hang one edge of the shrug (it doesn't matter which as it is symmetrical at this point) from one sleeve seam to the other, by inserting needles through the ribbing; hang it so the purl side faces you. You should pick up about (18", 20", 21") 22" worth of stitches, or (80, 88, 92) 96 stitches, total. The easiest way to hang a long piece like this is to start with the two very edge stitches - hang the edges of the section you want to pick up on the edge needles. Then pick out the middle and hang that stitch. Now do the same thing again - for each long area, hang a stitch in the middle. Keep subdividing your work like this and you will get a nice even hang.

Knit 24 rows, and convert to k2p2 ribbing - on the side facing you, you should start and end with purl ribs. Bind off these stitches at a medium tightness - the edge needs to be able to stretch a bit.

Now, hang the other edge, the same way you hung the first one. This edge will be the top; the collar starts out the same length as the back ribbing, but gradually grows to twice its length, so you can fold it over nicely. If you don't want a folding collar then you can do it the same way you did the bottom edge.

Get two yarn needles with a nice long piece of waste yarn on each, ready to hold stitches as you transfer them off the needles (or use long circular needles as stitch holders).
Start by knitting 24 rows. Take the two outermost stitches on either side, and transfer them to waste yarn, taking them off the needles. Convert the next two stitches on either side into a k2 rib, using your latch tool, and transfer them to waste yarn too.
Reset the counter to 1. Repeat the following 4 rows six times for a total of 24 more rows:
1. Knit a row. Transfer one stitch on each side to the waste yarn.
2. Knit a row. Transfer one stitch on each side to the waste yarn.
3. Knit a row.
4. Knit a row; convert the outermost two stitches into a k2 rib. Transfer both of these stitches to waste yarn.
When you have done all 24 rows, then bind off the whole section loosely - this edge must be stretchy. If you prefer, you can rehang the side stitches to bind off; I like to use the chain bind off, which does not require you to rehang stitches.

Lastly, sew the ends of the two bands of ribbing together. Weave in ends. Block, if desired - it's not necessary if you used Simply Soft, since acrylic doesn't really block. I generally throw Simply Soft items through the wash and dryer on low heat to even out the stitches, but you can't really do more shaping than that.

Sunday, December 28, 2008

Sackboy I


Here he is, in all his glory!

The original Sackboy. I am by far not the first to make one, but I did think of it on my own, before I knew others had done it.

He makes me very proud, even if he's not perfect - his arms and legs are disproportionately long. But other than that, I was super pleased with the final product here.

Made with Lion Brand Fisherman's Wool, black felt, a pink piece of Foamie, a working brass-tone jeans zipper, buttons, and accent stitches in LB Wool-ease Oatmeal. He's got a wire-frame skeleton, made from an old notebook, so he's fully poseable - even his thumbs.

I call him Sackboy I because he is the first of several planned ones. I already have two requests from close friends that I will honor, and during the construction of those I will be writing up a pattern with pictures that will be available on www.etsy.com. I'll make a note here when it's up. I considered selling these myself, but honestly it's a work of love - I don't think I could make enough money for it to be worth the time it took to make this one.

The next iterations will have a few other improvements - while the zipper on this one works, he's stuffed so full, it's hard to zip or unzip. The legs and arms will be proportionate, the body a bit larger, and I would like to add wire framing to the face so other expressions are possible.

Just like the real thing, Sackboy I gets around.

He digs the music. And this gives you a good idea of what size he is.
He's also really good with animals. Spiff likes him, anyway.
He gets a kick out of gaming. Unfortunately he can't play LBP at my house, though.
And one last standing shot, waving to the world.

Tuesday, December 23, 2008

Dreaming of an 8-bit christmas . . .

I have minions at my day job. And to thank them for doing the otherwise thankless job, I made them Christmas presents.

Cue images!!

What we have here are fleece hat versions of Mega Man, Proto Man, and a Tanuki suit. There are precedents - the people wearing these hats have photoshopped images of themselves as these characters on our door. Yes, I'm serious.

These were sewn, not knitted - once again I'm not even following my own rules. Sorry. But at least I think they enjoyed them, and it made me feel so deliciously nerdy to have made these.

If I get any requests, I can draw up a simple pattern. Each hat only took a few hours to cut and put together; just as much time was spent figuring them out as making them, probably.

Wednesday, October 15, 2008

This is what happens when I feel like making something, but I don't plan

About a week ago, I was sitting on the couch and was struck by a sudden desire to make something. I have a lot of craft supplies just lying around, and lately I have been on a wire-and-glass kick. I got to thinking about how wire is so much more organic-looking. And then this came out.


Three large glass leaf beads, a number of seed beads in shades of tan/brown and copper, copper wire, and some green ribbon. It's just barely bigger than a choker - it rests at the base of my neck. It closes with a loop of ribbon that just fits over a large roundish glass bead.

I do wish, now, that I had planned it better. As it was I sort of just kept going until it seemed done, but with some careful design it probably would have been nicer. Also, I really need practice with wire. In some places it is wobbly, where I would rather have it smooth. It's also a bit poky. Still, though, I love this. It makes me wish I had more open-necked tops, like a simple boatneck in some neutral color. Perhaps I will knit one, if I ever finish with all the other projects I have ongoing.

One more detailed picture below.